Reverse engineering an Acer KU-0355 keyboard
For the last few weeks, I’ve been working on building a MAME arcade machine from an old computer. The software part is done (I’ll cover that in another post), and I have started to prepare the hardware. To save some money, I decided not to buy the I-PAC. Instead, hacking a keyboard seemed cheaper, and I just happened to have a lot of old, unused keyboards at hand. I thought that I’d just connect some wires from the keyboard to a button; when the button is pressed, it would emulate a keystroke. The only problem was that it would take up too much space, and it wouldn’t be practical. The connections wouldn’t be optimal, the keyboard might fall… All in all, a better approach was possible, and much needed.
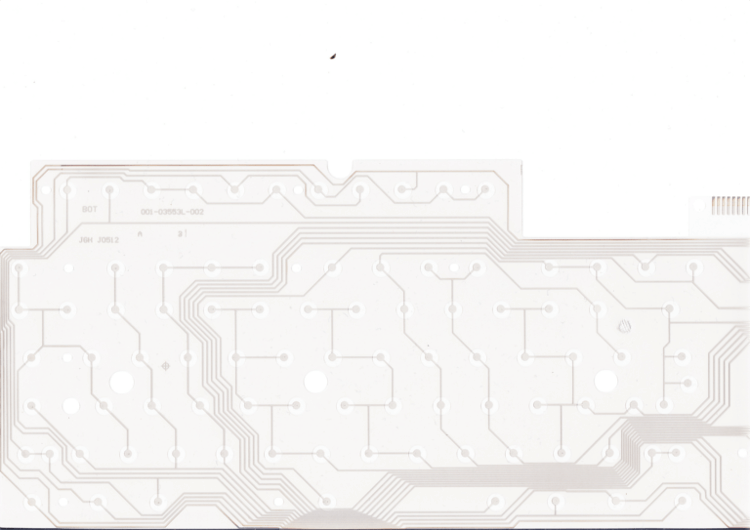
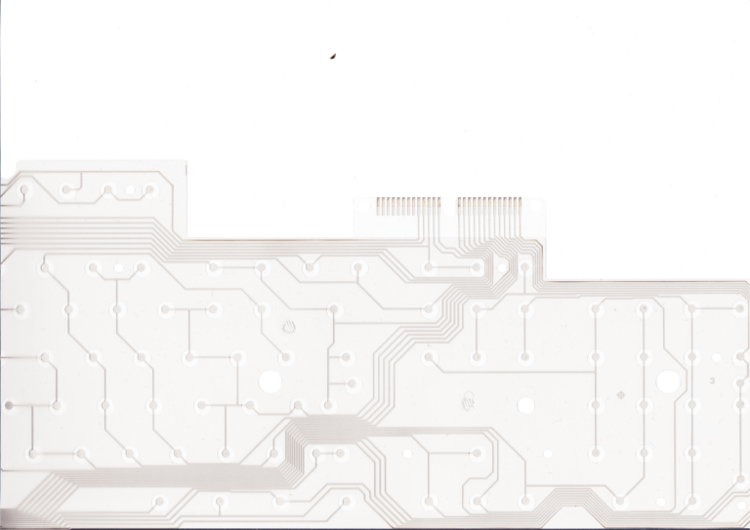
If you open up a keyboard, you’ll often find a small PCB connected to a USB cable (sometimes to some LEDs too), a rubber sheet with dots on it, and to three plastic sheets:
- The rubber sheet is filled with small rubber buttons; when you press a key, it pushes one of these little rubber buttons down.
- The top sheet is a printed circuit with dots, each dot corresponding to one key.
- The middle sheet is just plain, transparent plastic with holes where the dots on the sheet below are.
- The bottom sheet is another printed circuit with dots, each dot corresponding to one key.
When you are pressing a key, you are in fact creating a connection between the top and the bottom sheet. The connection you just created connects two pins on the PCB. Depending on the connected pins, the PCB will output a different signal, which will be interpreted as a different keystroke. As you can see on the pictures below, some buttons are on the same line. If two buttons are on the same line on the bottom sheet, they won’t be connected like that on the top sheet, thus creating a new combination of pins for each key. This may seem complicated, and if you don’t understand it, try to open up a keyboard; there’s a lot to learn from it.
I threw the middle sheet out; I didn’t need it.
I started out by scanning my two sheets. They were a bit longer than a piece of A4 paper, and my Canon MP640 couldn’t scan a complete sheet. I ended up scanning each plastic sheet twice. This is what the scans of the bottom sheet looked like:
To stitch them together, I used Microsoft ICE: it’s a great piece of software from the Microsoft Research team. It stitches multiple photos into one big panorama, and does so perfectly: forget the skewed, distorted panoramas that you may have taken with your phone, this software almost never makes mistakes.
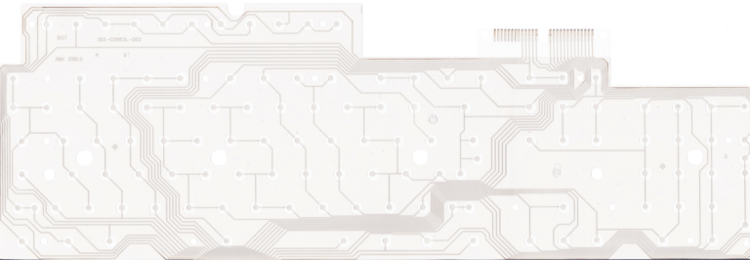
So I had my two huge scans (they were about 12MB each). I may have asked for a too good quality, as a tenth of the resolution I had would have been sufficient. If your scanner lets you choose the resolution of your scan, 200-300 dpi should be more than enough – I had asked for 600.
I edited the stitched scans with GIMP. The first thought was to use the magic wand and some “clever” contrast and coloring. That wasn’t a huge success, so I just ended up linking the the dots to the pins with the good old pen and my shift key (it adds the option to draw a line with the pen).
This are the results I got:
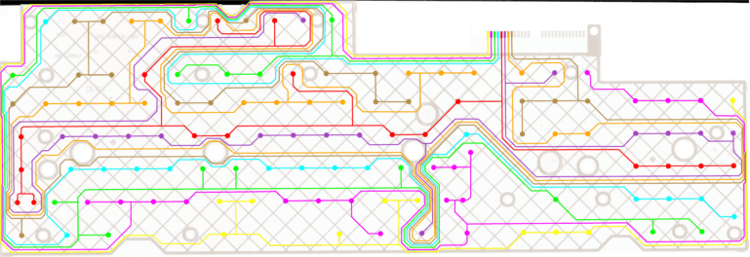
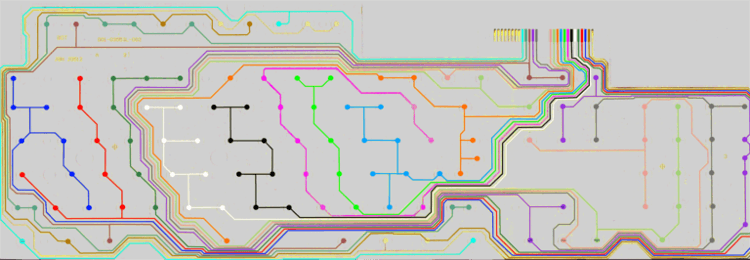
Interestingly enough, some dots weren’t used at all: they didn’t correspond to any rubber button, or to any key on the keyboard! I guess that the manufacturer did this so that they would be able to use the same plastic sheets for different keyboard layouts. I named all the pins, from A (to the left) to Z (to the right).
Here is the list of what keys each pin is responsible for:
Bottom sheet:
I: Volume +, left Ctrl, right Ctrl
J: Play/Pause, Search, Mail, Sleep, left Shift, right Shift
K: Prt Screen, e Scr Lk, browser, Alt, Alt Gr
L: Up, Left, Numpad Enter, Numpad +, Home, End, Pause/Break
M: Numpad ,, Numpad 3, Numpad 6, Numpad 9, Numpad *, Numpad -, Page Up, Page Down
N: F11, Down, Num Lock, Numpad 7, Numpad 4, Numpad 1, Delete
O: Insert, F12, Right, Numpad 0, Numpad 2, Numpad 5, Numpad 8, Numpad /
P: Enter, Backspace, F10, F9, F5, Space
Q: *, Ø, Æ, -, Å, P, +, 0
R: ., L, O, 9, F7, F8
S: ,, K, I, 8, F6, ´, ^
T: M, N, J, H, U, Y, 6, 7
U: B, V, G, F, R, T, 4, 5
V: C, D, E, 3, F2, F3, F4
W: <, Caps Lock, X, S, W, 2, F1
X: Tab, ½, Esc, 1, Q, A, Z
Y: Context Menu, left Windows, Previous, Next
Z: right Windows, Stop, Volume -, Mute
Top sheet:
A: Space, B, N, Alt Gr, -, left Shift, Left, Down, Right, Numpad -
B: Z, X, C, V, M, ,, ., right Windows, right Ctrl, right Shift, Enter, *, Numpad *, Numpad /, Num Lock, Pause/Break
C: F6, F5, F4, Mute, Play/Pause, Esc, left Alt, <, G, H, Ø, Up, Numpad 0, Numpad ,
D: Sleep, left Windows, A, S, D, F, J, K, L, Æ, Numpad 1, Numpad 2, Numpad 3, Numpad Enter
E: Numpad 4, Numpad 5, Numpad 6, Backspace, ^, Å, F7, Y, T, F3, Volume +, Stop, Tab, Caps Lock, left Shift
F: e Scr Lk, Numpad 7, Numpad 8, Numpad 9, Numpad +, Context Menu, P, O, I, U, R, E, W, Q, Volume -
G: Prt Scrn, End, Page Down, 1, 2, 3, 4, Search, Previous, 7, 8, 9, 0, F10, F11, F12
H: Delete, Insert, Home, Page Up, left Ctrl, ½, F1, F2, Browser, Mail, Next, 5, 6, F8, F9, +, ´
To find the pins corresponding to a key, you’ll have to search in the bottom sheet for the wanted key, and then again in the top sheet for the same key. You’ll then have to make the connection from your 2 pins to something else (a button, a pedal, whatever). To find the pins corresponding to a key, you can use this table:
| A | B | C | D | E | F | G | H | |
| I | Right Ctrl | Volume + | Left Ctrl | |||||
| J | Left Shift | Right Shift | Play/Pause | Sleep | Search | |||
| K | Alt Gr | Alt | e Scr Lk | Prt Screen | Browser | |||
| L | Left | Pause/Break | Up | Numpad Enter | Numpad + | End | Home | |
| M | Numpad - | Numpad * | Numpad, | Numpad 3 | Numpad 6 | Numpad 9 | Page Down | Page Up |
| N | Down | Num Lock | Numpad 1 | Numpad 4 | Numpad 7 | F11 | Delete | |
| O | Right | Numpad / | Numpad 0 | Numpad 2 | Numpad 5 | Numpad 8 | F12 | Insert |
| P | Space | Enter | F5 | Backspace | F10 | F9 | ||
| Q | - | * | Ø | Æ | Å | P | 0 | + |
| R | . | L | F7 | O | 9 | F8 | ||
| S | , | F6 | K | ^ | I | 8 | ` | |
| T | N | M | H | J | Y | U | 7 | 6 |
| U | B | V | G | F | T | R | 4 | 5 |
| V | C | F4 | D | F3 | E | 3 | F2 | |
| W | X | < | Sleep | Caps Lock | W | 2 | F1 | |
| X | Z | Esc | A | Tab | Q | 1 | ½ | |
| Y | Left Windows | Context Menu | Previous | Next | ||||
| Z | Right Windows | Mute | Stop | Volume - |
For my arcade, I’m mostly going to use numbers 1 to 5, arrow keys, Ctrl, Alt, Space, R, D, F, G, Q and A, and perhaps also media keys.
So that’s basically how to reverse engineer a keyboard! At this point, you can throw everything but the PCB out. Scan, stitch, color, list, solder, and you’re ready to go!
« Back